
 Business Apps·09 July 2026·12 min read
 Dataverse Custom API Toolkit: Build Dataverse Custom APIs Right in VS Code
Dataverse Custom API Toolkit: Build Dataverse Custom APIs Right in VS Code
If you’ve ever created a Custom API in Dataverse by hand, you know the fiddling: in the Maker Portal you click your way through the message, the request parameters and the response properties, typing uniqueName, bindingType and types one by one — and you only notice on the first call that a parameter is missing, a name has a typo, or a response property was never created. No diff, no versioning, no “let me dry-run this first.”
The Dataverse Custom API Toolkit is a VS Code extension that pulls exactly this work into the editor. It’s a graphical layer on top of the dataverse-custom-api CLI (dvc): you see your Custom APIs in a tree, edit their parameters in a form, export them as a versionable JSON file into your workspace, and apply changes first as a simulation, then live against Dataverse. Same core rule the manual path lacks: before every write, you see exactly what would happen.
The basics: Custom API, request parameter, response property
Quick framing in case you don’t work with this daily:
- A Custom API is a custom message (action or function) in Dataverse — your own endpoint that you can call like
WhoAmIorCreate, only with your own logic behind it. It’s defined through metadata: name, binding, an optional plugin type, plus its parameters. - A request parameter is an input value of the API — with a
uniqueName, a type (String, Integer, Entity …) and a flag for whether it’s optional. - A response property is a return value — the name and type the caller gets back.
Instead of clicking this web together in the portal, you describe it as JSON and let the toolkit reconcile it with Dataverse.
Screen by screen: the interface
After installing, you get a dedicated Dataverse Custom API Toolkit icon in the Activity Bar. Behind it sit three panels: Environments, Custom APIs and Actions.
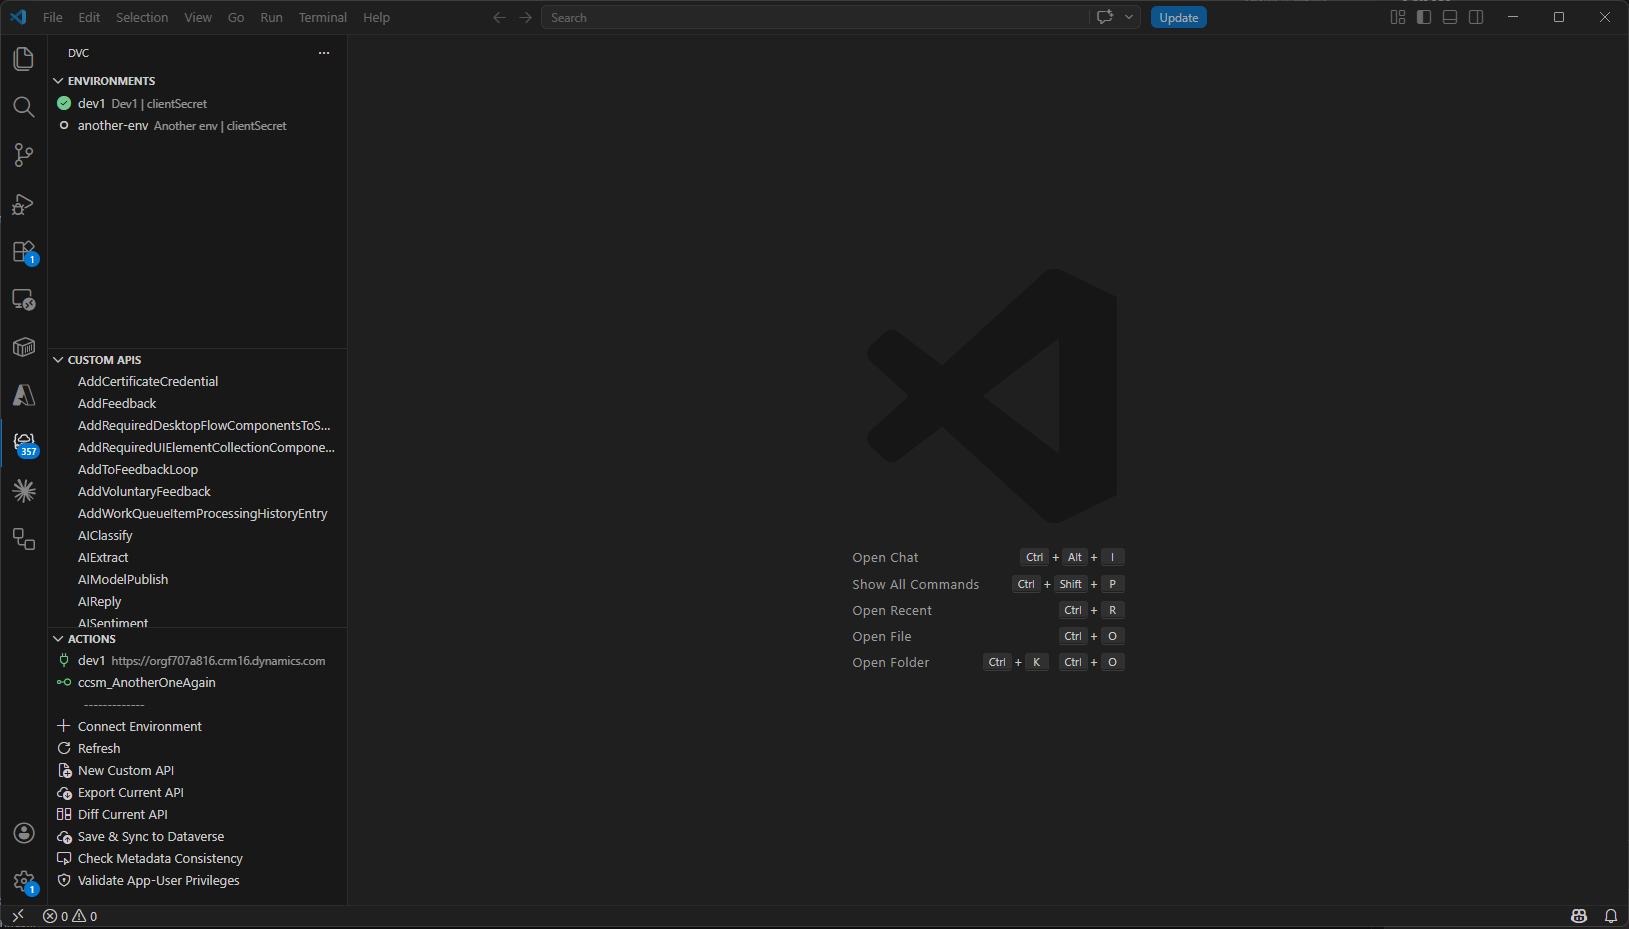
1. Environments — your environments
The Environments view lists your saved Dataverse environments. Environments are managed globally in the extension (not per workspace); secrets live safely in VS Code’s context.secrets — never in plain text in the project.
The view’s title bar holds Connect Environment (+) and Refresh. Each entry has inline Use (connect / set active), Edit and Remove.
Connect Environment opens a guided wizard — a chain of input boxes at the top of the VS Code window:
- Display Name — a friendly name.
- Dataverse Environment URL — e.g.
https://org.crm4.dynamics.com(validated forhttp…). - Authentication Mode — pick from deviceCode (Device Code Flow, recommended), interactiveBrowser (browser login) or clientSecret (app-only).
- Tenant ID and Client ID of your Azure AD app registration.
- Client Secret — only for
clientSecret, as a masked password field; stored in VS Code secrets.
Finally the extension writes a compatible auth.json into its runtime cache (the bridge to the CLI) and calls connect.
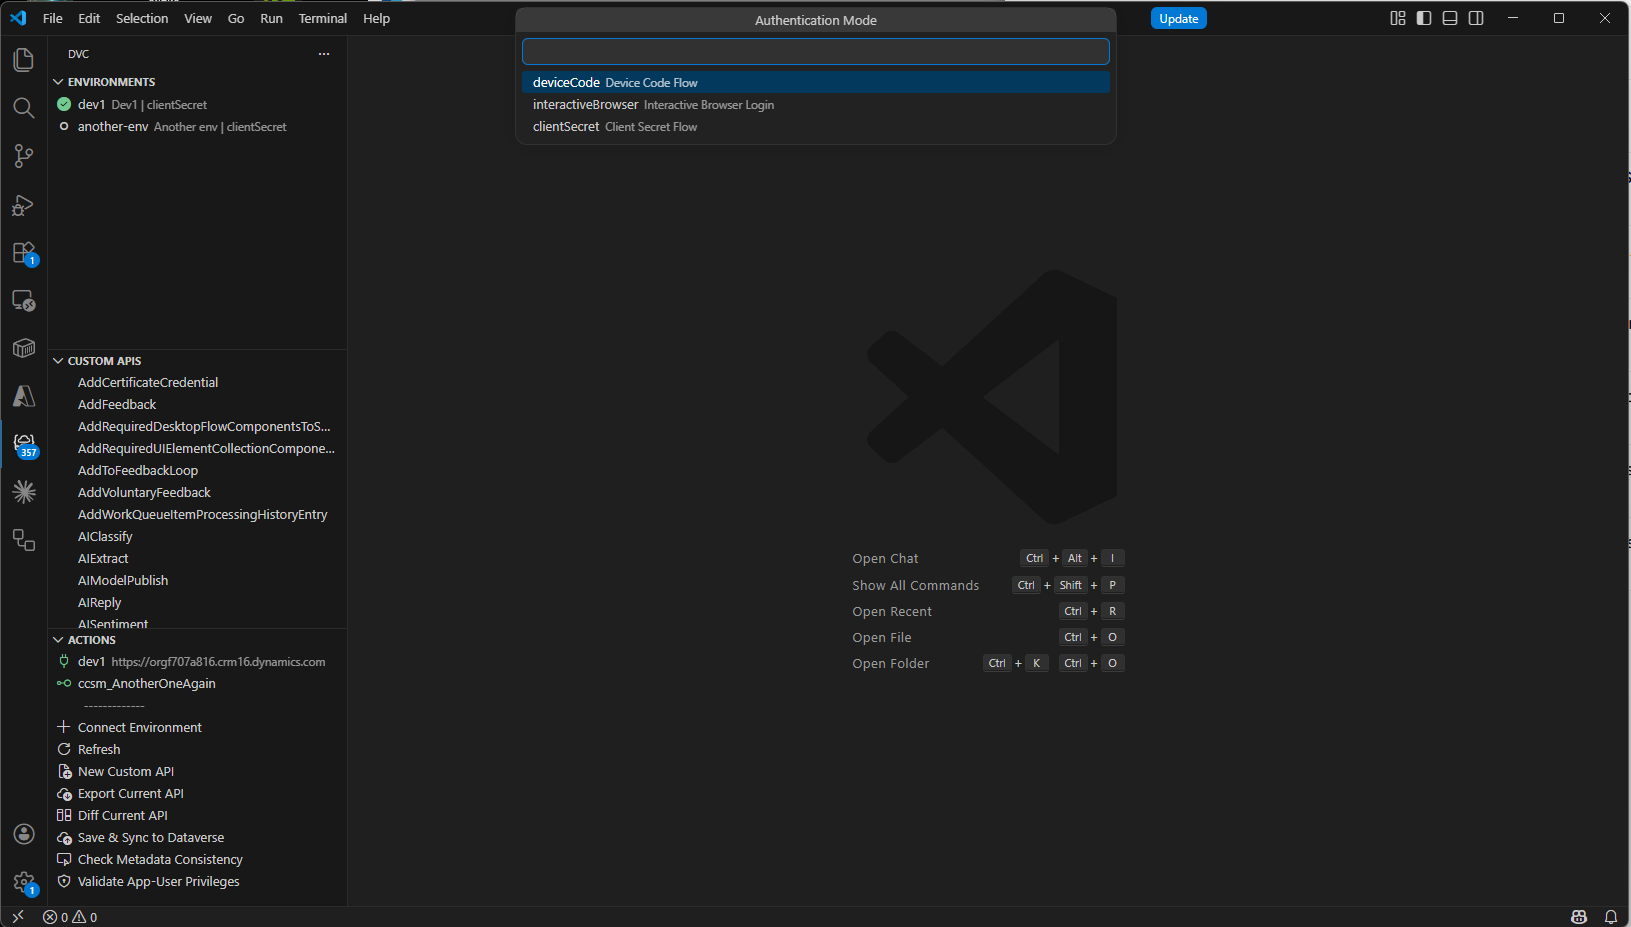
2. Custom APIs — your workspace
The heart of it. The Custom APIs view lists every Custom API in the active environment. Each entry shows a short status next to its uniqueName: local · dirty · active — plus a matching icon:
- green check — active API, local and in sync,
- ⚠ warning — the local file differs from the last saved one (dirty),
- code-file icon — exported locally, clean.
A badge in the top right shows the count (e.g. “7 of 20” when a filter is active). The title bar has Refresh, Filter and Search by Name; the title reflects active filters as chips — e.g. Custom APIs · no private · Global, Entity · "reorder".
Each entry has inline: Use (set as active API), Export (pull from Dataverse into a local JSON) and — once a local file exists — Open JSON, Edit and Save & Sync. The context menu adds Diff vs Remote and Remove Local.
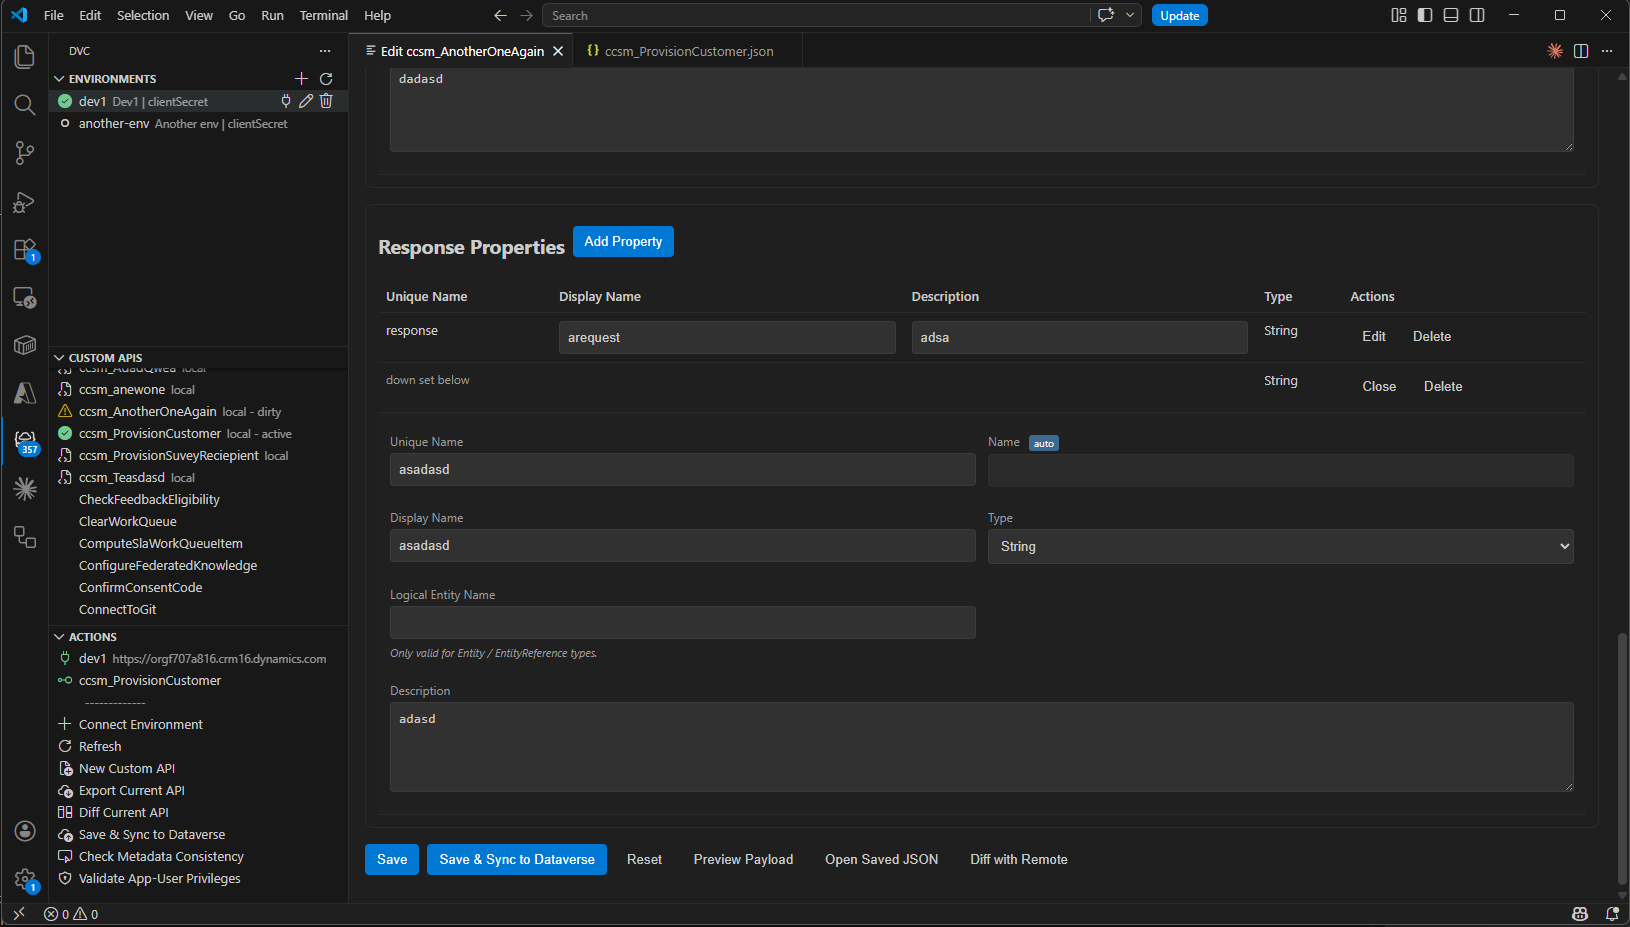
3. The Custom API editor — where the real editing happens
Click Edit on a local API and a form editor (webview) opens as its own tab, “Edit <uniqueName>”. The title gains a ● dot the moment you have unsaved changes, and a dirty banner appears at the top (“Unsaved changes — Save to write locally, or Reset to discard.”).
The editor has three sections:
General — the API’s header data in a grid: Unique Name (with an immutable badge and a warning that changing it would delete and recreate the entire API), Display Name, Name, Binding Type (Global / Entity / EntityCollection), Description, Execute Privilege Name, Bound Entity Logical Name, the plugin fields (Plugin Type Name, Plugin Type ID read-only, Plugin Assembly Name …) and Allowed Custom Processing Step Type (None / AsyncOnly / SyncAndAsync). Plus three checkboxes: Is Function, Is Private, Workflow SDK Step Enabled.
Request Parameters — a table (Unique Name · Display Name · Description · Type · Optional · Actions) with Add Parameter. Each row expands to set details like Logical Entity Name.
Response Properties — the same idea without the Optional column, with Add Property.
For Type you get the same fixed choice everywhere: Boolean, DateTime, Decimal, Entity, EntityCollection, EntityReference, Float, Integer, Money, Picklist, String, StringArray, Guid.
At the bottom, the toolbar: Save, Save & Sync to Dataverse, Reset, Preview Payload, Open Saved JSON and — if the CLI supports it — Diff with Remote.
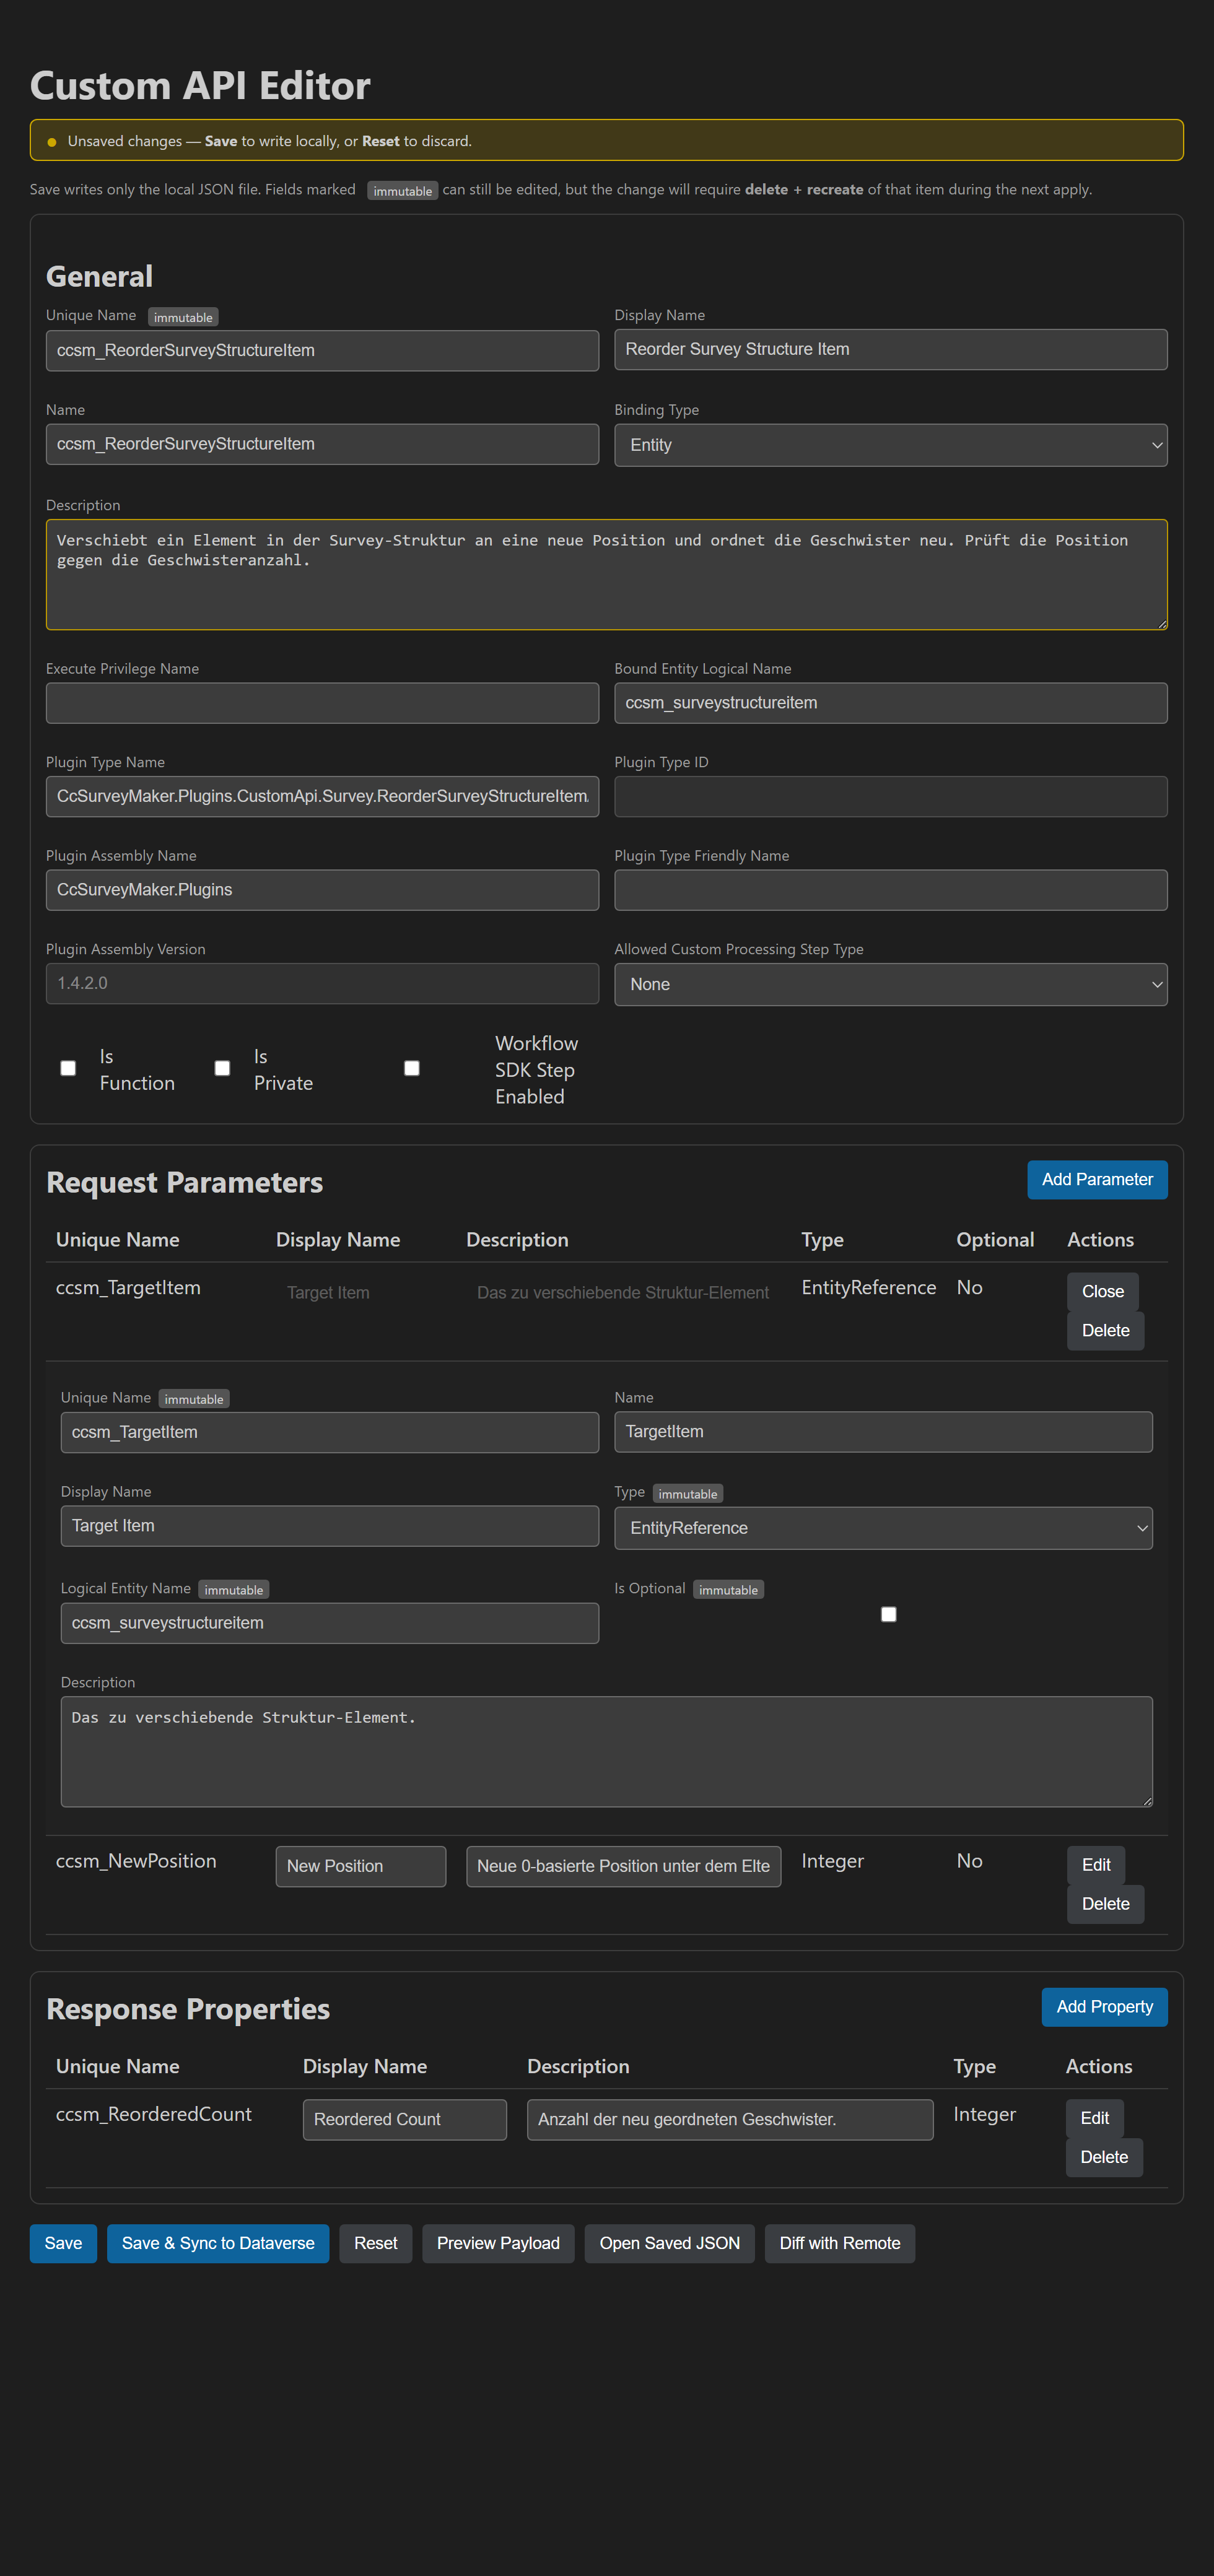 The Custom API editor with the request parameter
 ccsm_TargetItem expanded — Type, Logical Entity Name and Unique Name all carry the immutable badge. The yellow dirty banner up top flags unsaved changes; the changed field gets a yellow border.
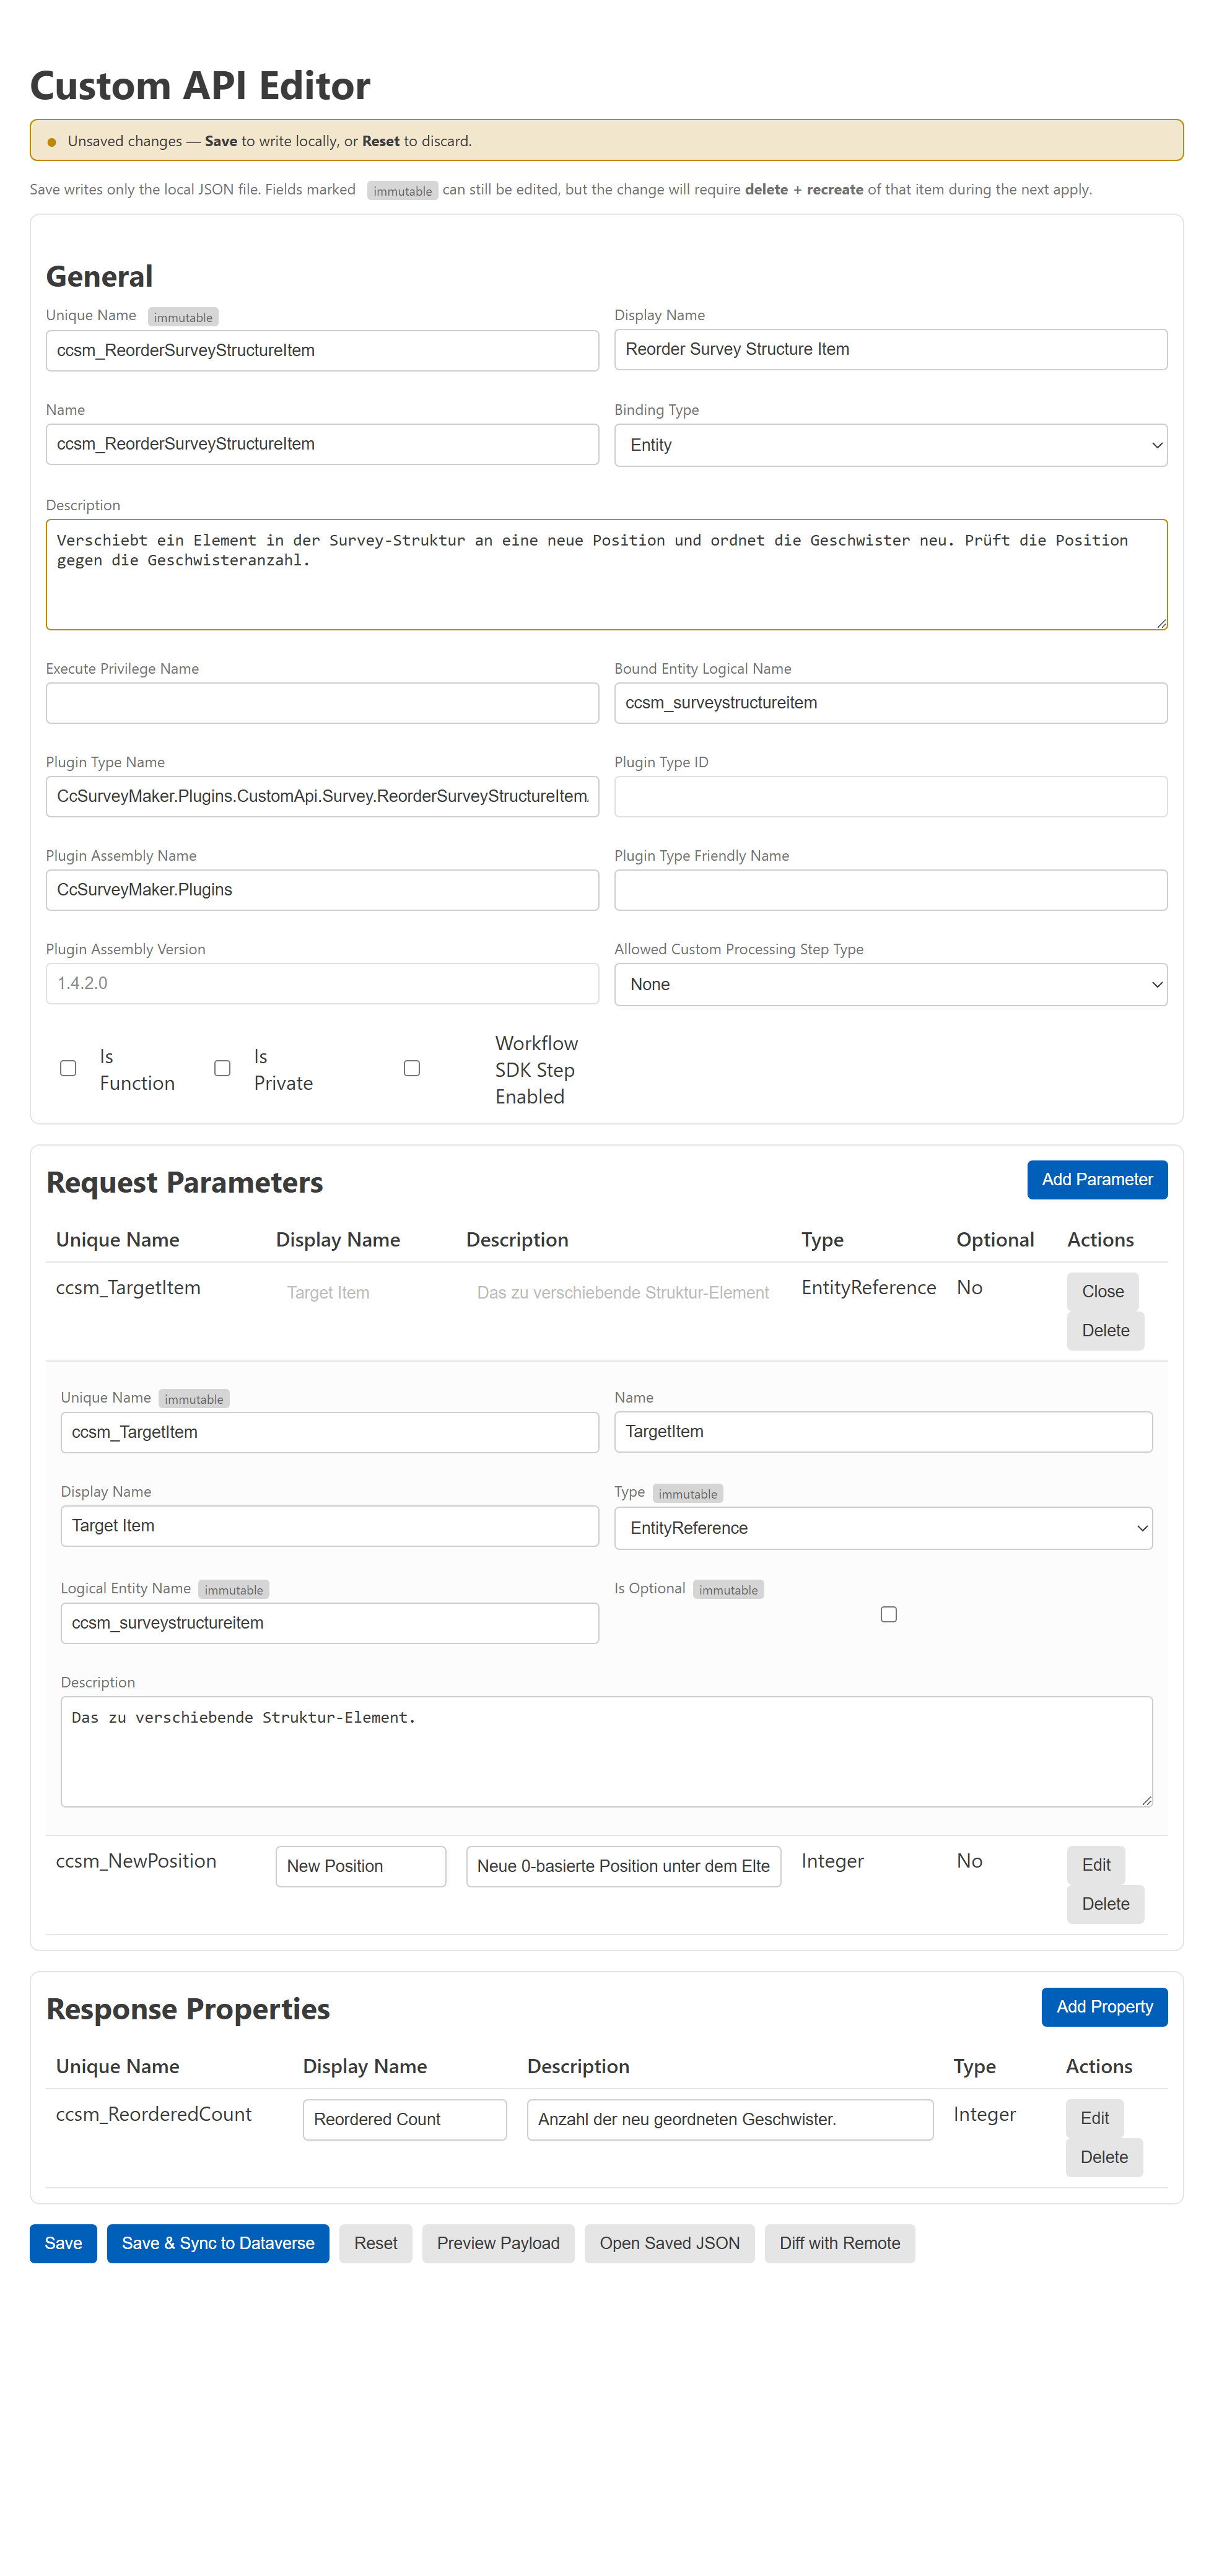 The light variant — at the bottom the full toolbar: Save, Save & Sync to Dataverse, Reset, Preview Payload, Open Saved JSON, Diff with Remote.
4. The sync plan — look first, then write
Save writes only the local JSON. Save & Sync to Dataverse opens the sync plan beside it (webview “Sync: <uniqueName>”). First a progress notification runs (“Checking sync status…”): the toolkit diffs your local definition against Dataverse. If everything matches, it simply reports “already in sync — no changes needed” and does nothing.
If there are differences, you see an operations list — each planned change as its own row. When destructive steps are required (because an immutable field changed), a section titled ”⚠ Why are destructive operations needed?” spells out in plain language which field changed and why that forces a delete-and-recreate.
Two buttons: Simulate (dry run — plays through every operation without writing) and Execute (live). Each operation gets a live status: running → ok / failed with a duration; on a failure, the run stops.
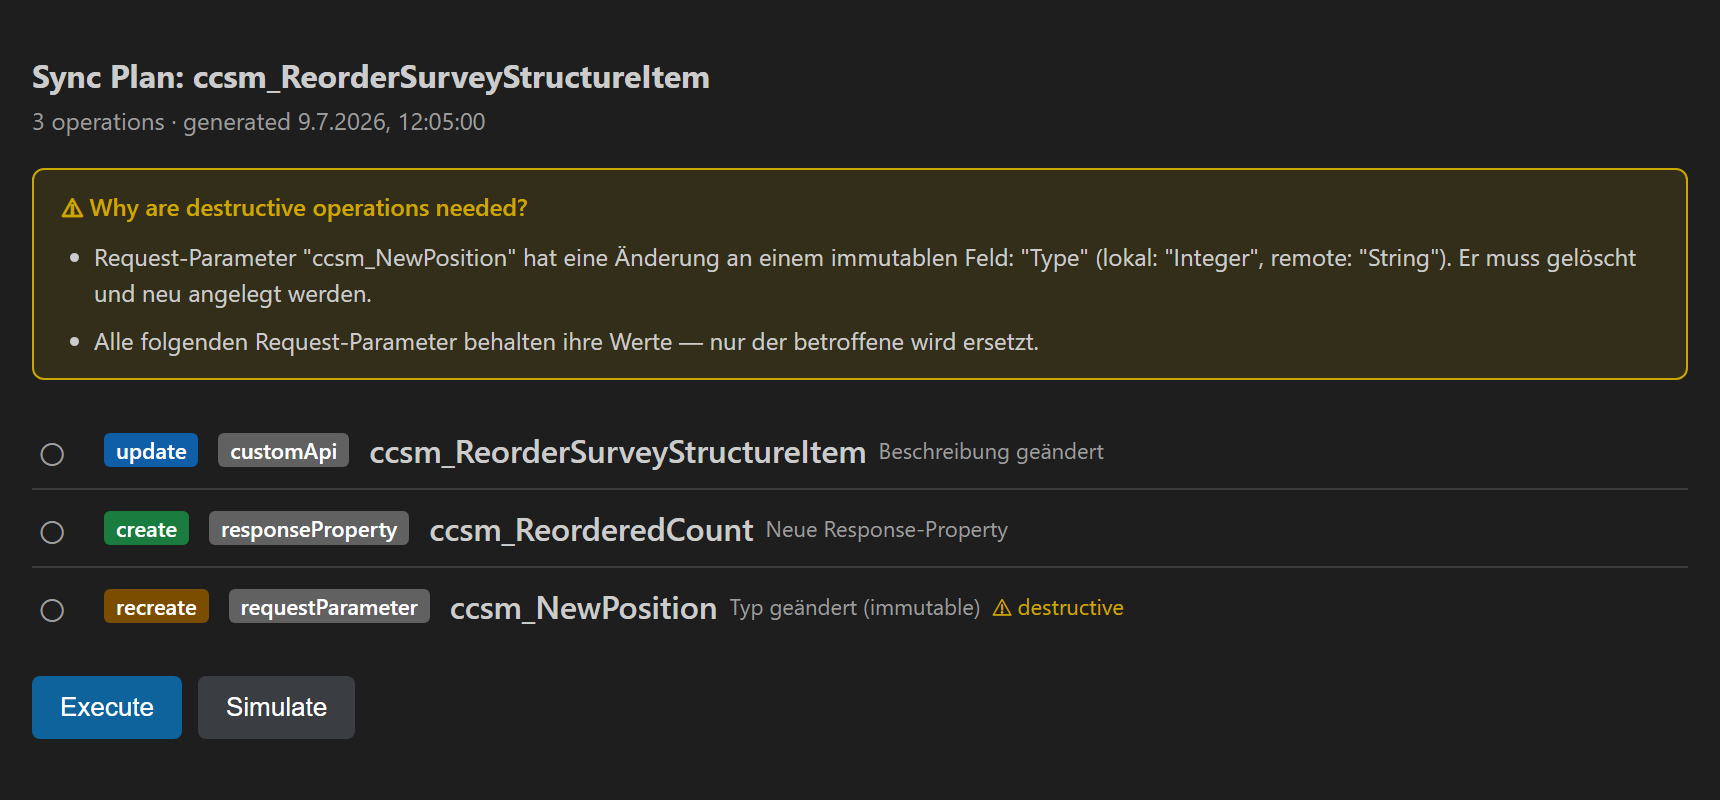 The sync plan before writing: a
 recreate is needed because the type of ccsm_NewPosition changed — the yellow box spells out exactly why. Nothing is written until you click Execute.
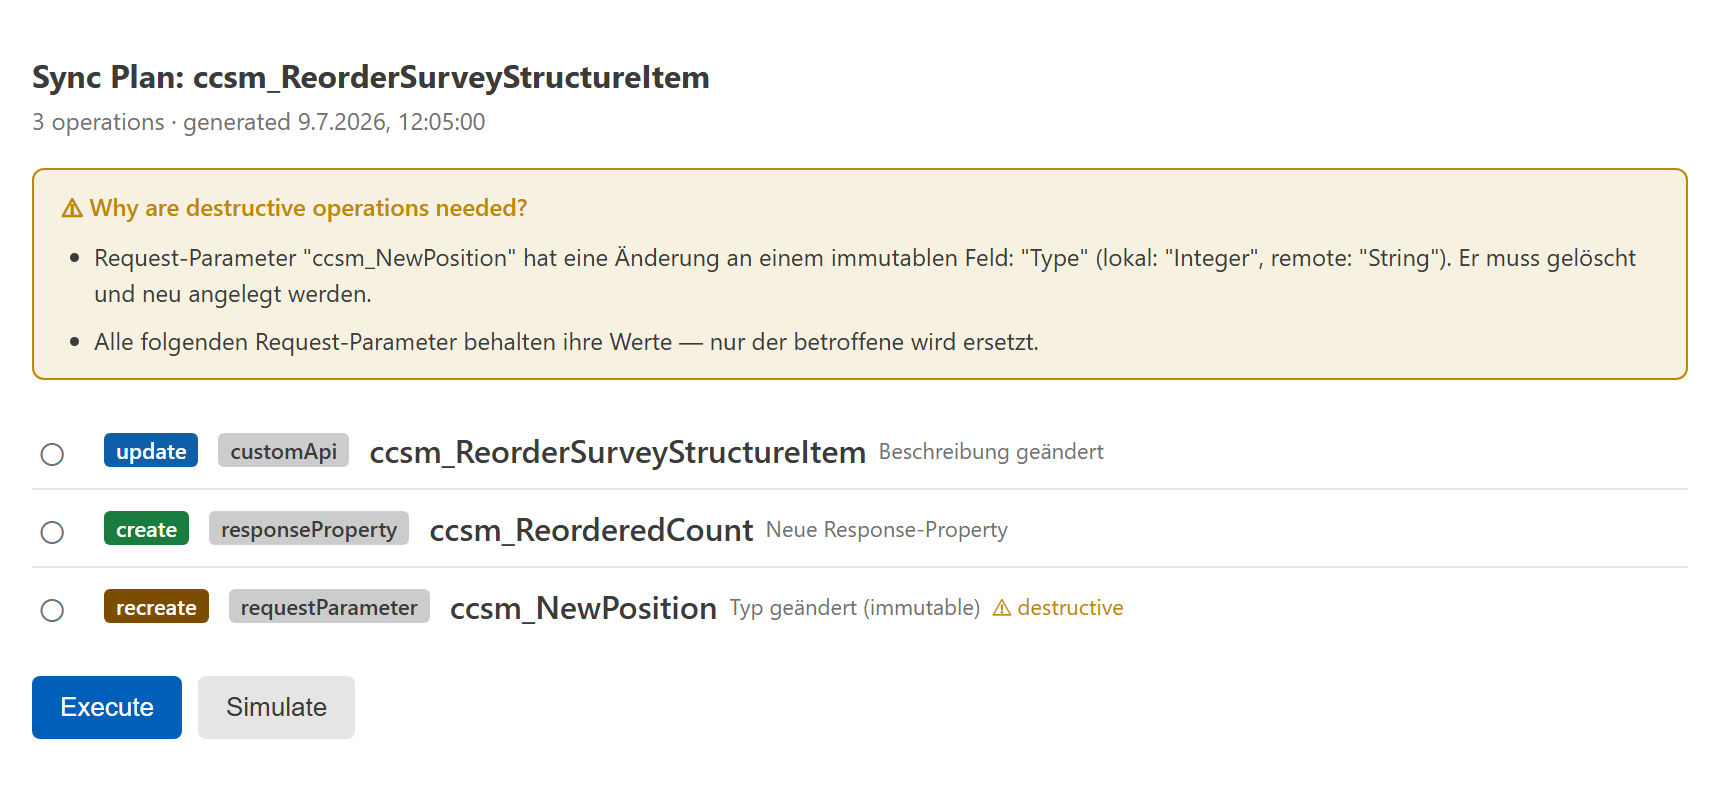 The same view in light — the action badges (update, create, recreate) and the
 ⚠ destructive marker stay unambiguous in both themes.
5. Actions & Diff
The Actions view is your status board: it shows the active environment (with URL) and the active Custom API at the top, then quick actions below: Connect Environment, Refresh, Export Current API, Diff Current API, Save & Sync to Dataverse.
Diff opens the metadata comparison local ↔ Dataverse as a JSON document beside your editor — handy for seeing exactly what differs before a sync.
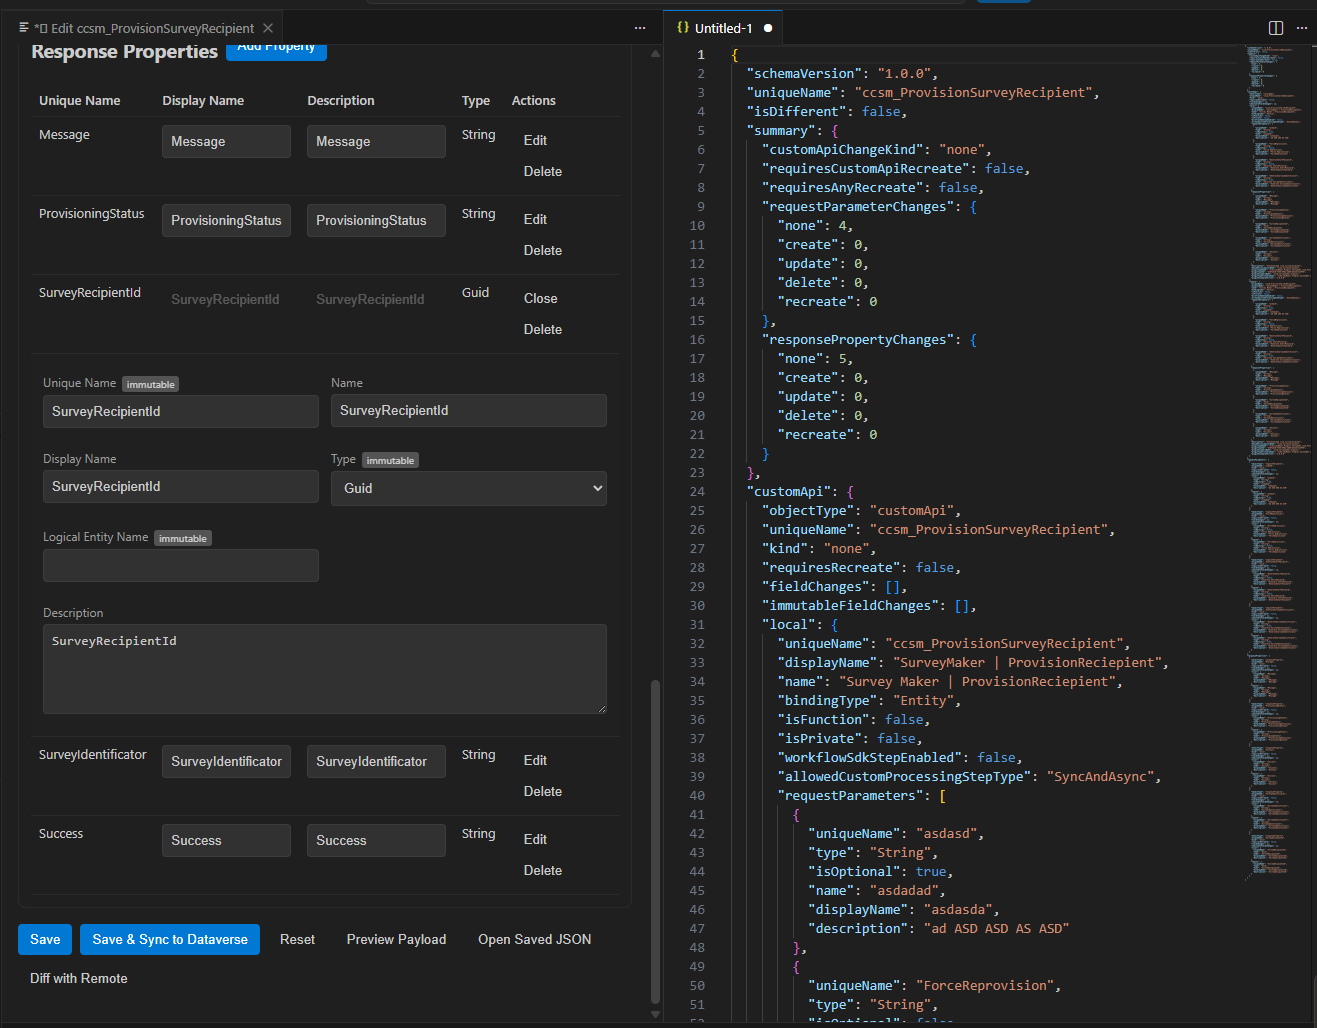
The workflow in one sentence
Connect environment → select Custom API → export (Dataverse → local JSON) → edit in the form → check Preview Payload / Diff → Simulate (dry run) → Execute (live).
Because the exported JSON lives in your workspace, you can version it normally (Git), review it as a team and reconcile it against the environment anytime via Diff. Change the file directly in the text editor or via the CLI, and the extension notices through a file watcher and refreshes the tree.
Validation & diagnostics
The toolkit catches errors at several points before they land in Dataverse.
Right in the editor it marks immutable fields with a badge and warns when you change one — because Dataverse doesn’t let some fields be altered in place, only via delete + recreate. Change the type of a request parameter, say, and the toolkit automatically plans a replace instead of an update and tells you so in the sync plan.
As its own action there is also Check Metadata Consistency: one click verifies whether your local definition still matches Dataverse. When everything is clean you get “No metadata mismatches found” — along with the full request-parameter and response-property lists.
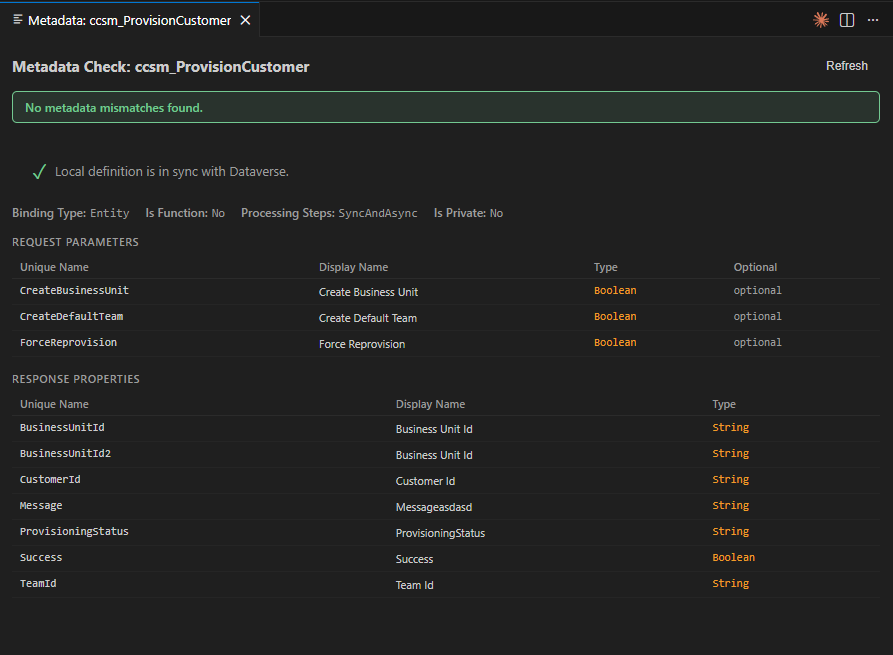
The deeper rule check comes from the CLI (dvc api validate) — purely local, blocks nothing, gives you instant feedback. These are the rules worth keeping in mind:
| Rule | Meaning |
|---|---|
uniqueName with a publisher prefix (e.g. ccsm_), max. 128 chars | Missing prefix / too long → error |
name / displayName max. 100 chars | Over the limit → error |
description max. 300 chars | Over the limit → error |
bindingType ∈ Global / Entity / EntityCollection | Any other value → error |
boundEntityLogicalName for Entity / EntityCollection | Required, otherwise error |
logicalEntityName only for type Entity / EntityReference | Otherwise redundant / info |
| A function needs ≥ 1 response property | Otherwise error |
The CLI’s severity levels:
| Severity | Means |
|---|---|
| error | Blocking — Dataverse would reject the create with a 400. |
| warning | Accepted, but deviates from the recommendation. |
| info | A hint, e.g. an open entity type without logicalEntityName. |
Every finding comes as a structured JSON envelope (CcdvCommandResult) with code, jsonPath and suggestedFix — exactly the format that later plugs cleanly into VS Code’s Problems panel or as a Quick Fix.
Permissions: the common stumbling block
For a sync to succeed, the connected user needs the right privileges. The CLI checks this with dvc api validate-privileges: prvRead/Create/Write/Delete on CustomAPI, plus prvAppendToPluginType and prvCreateSdkMessageProcessingStep.
The same check is available as a one-click action in the extension — Validate App-User Privileges in the Actions bar. The result shows up in the “DVC” output channel: each of the six privileges with a green check, followed by the plain-text summary “All 6 privileges available”.
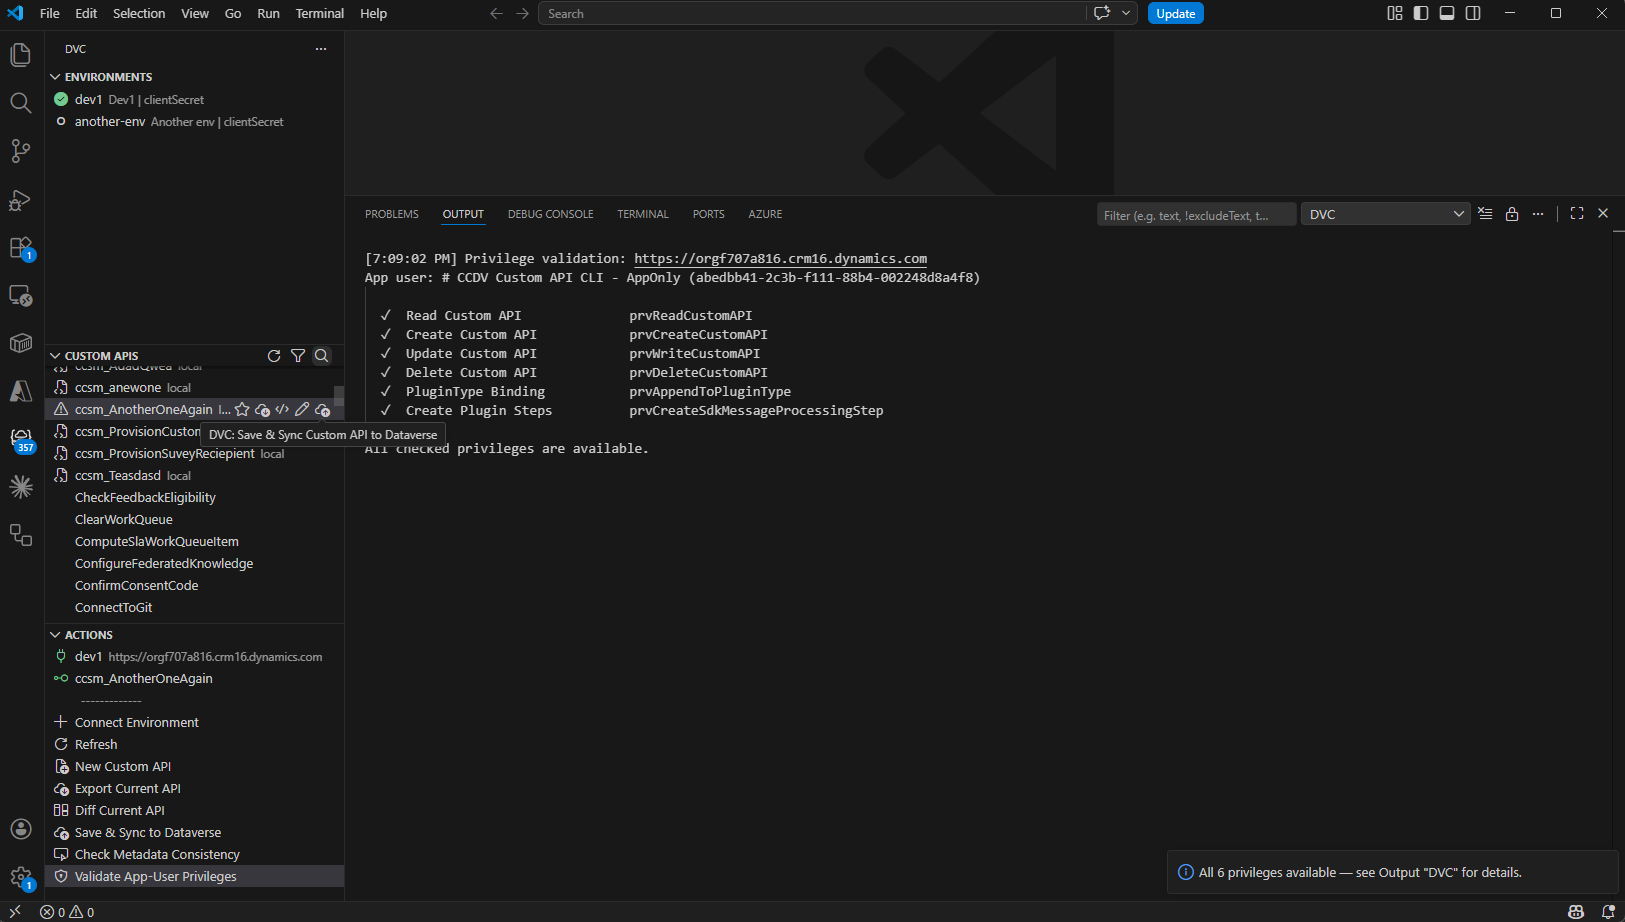
The important part is the graceful fallback: if prvAppendToPluginType is missing, the run doesn’t hard-fail — the toolkit instead creates the Custom API without the plugin type binding and emits a warning. So you get a usable result plus a clear pointer to which privilege is missing. In the extension UI a real permission problem shows up as a failed operation in the sync plan (status failed with a message).
Under the hood
The extension doesn’t build the Dataverse calls itself — it’s a wrapper around the npm package ccdvcustomapi (the same engine as the dvc CLI). Through a compatible auth.json in the runtime cache it passes your environment and auth data to the CLI engine, while secrets stay in VS Code secrets. Custom APIs live as a JSON catalog in the workspace, and every change goes through the same envelope (CcdvCommandResult) as in the CLI.
Two details that make daily use pleasant:
- Hash-based dirty detection. On export the toolkit remembers a hash of the file. Change it later and it re-compares and marks the API as dirty in the tree — so you see at a glance what isn’t synced yet.
- File watcher. Create a Custom API JSON via the CLI or edit it in the text editor, and the tree refreshes automatically. Extension and CLI share the same workspace folder without stepping on each other.
Install & get going
The prerequisite is the dataverse-custom-api CLI (@brunsforge/dataverse-custom-api) — the extension is the graphical layer on top of it. You’ll find the CLI’s source and docs openly on GitHub: github.com/brunsforge/dataverse-custom-api.
The extension is available on the Visual Studio Marketplace as Dataverse Custom API Toolkit (publisher brunsforge). Install it straight from VS Code via Extensions → “Dataverse Custom API Toolkit”, or from the command line:
code --install-extension brunsforge.dataverse-custom-api-toolkitThe short workflow once everything is installed: in the toolkit’s activity bar, connect your Dataverse environment via Connect Environment (Device Code is enough), pull the API you want with Export in Custom APIs, adjust it in the form via Edit, check what would change with Preview Payload or Diff, then open Save & Sync and run the plan first as Simulate, then Execute. From there your Custom API definition lives as versioned JSON in your repo — reviewable, diffable, repeatable.