
 Business Apps·08 July 2026·11 min read
 LookupImportPlus for XrmToolBox: import Dataverse lookups without guessing
LookupImportPlus for XrmToolBox: import Dataverse lookups without guessing
You know the scenario: you export a list from Dataverse, someone types a company name into a column, you import it back — and half your contacts end up on the wrong account because two companies happen to be called “Contoso GmbH”. The standard import silently took the first hit. No warning, no error. You notice weeks later.
LookupImportPlus is an XrmToolBox plugin (WinForms, .NET Framework 4.8) that makes that impossible. Its core rule: lookups are resolved deterministically or escalated to a human — never guessed. This article shows two things concretely: how to build a configuration step by step, and how the different resolution methods (GUID → business key → search field) interact in detail.
The plugin is a port of a Power Apps code app to the Dataverse SDK (instead of the Web API) — the same menus and workflows, but native in XrmToolBox. As of this article: version 0.1.13. The UI shown here is German (it follows your Windows UI culture); button labels are given with an English gloss.
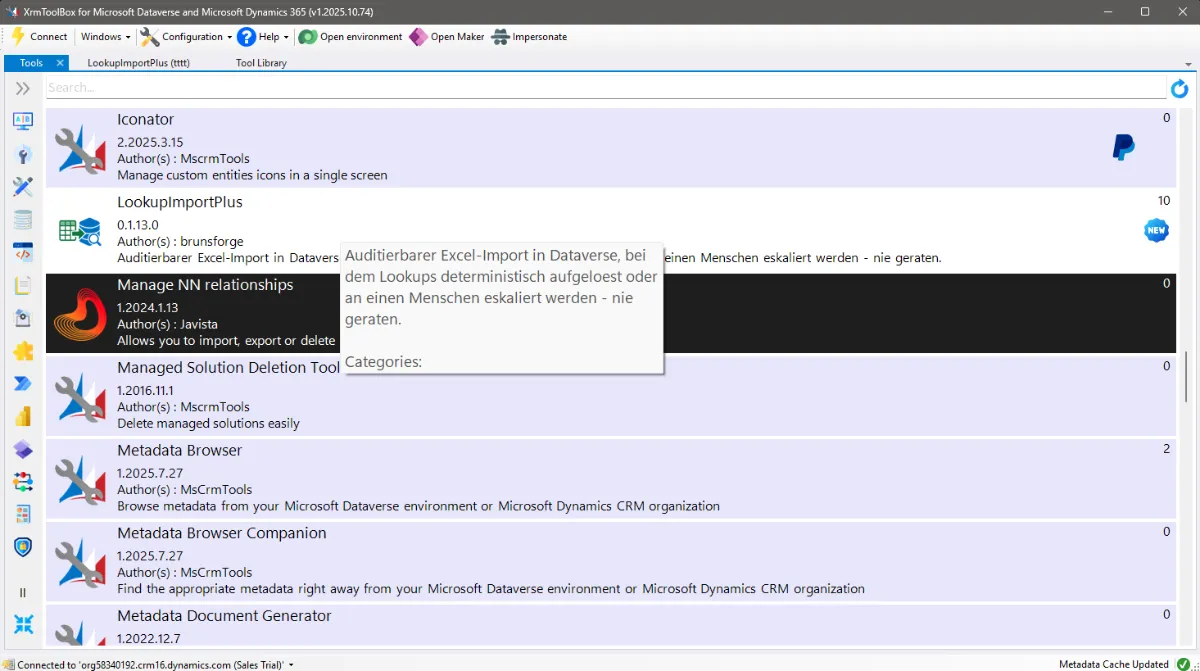 Search for “LookupImportPlus” in XrmToolBox and open it. The connection comes from the host — no separate login.
Why the standard import fails on lookups
A lookup in Dataverse isn’t a text column — it’s a reference to a record in another table, technically by that record’s GUID plus the target table. A contact’s “Firma” (Parent Account, parentcustomerid) doesn’t point at the name “Contoso GmbH”; it points at a concrete account record.
The standard Excel import only knows the name. If it finds several matches, it silently takes the first. LookupImportPlus flips that: resolve unambiguously, or stop and ask you.
The principle: configuration first, then the round-trip
You don’t start from a spreadsheet. You start from a job configuration: a saved, versioned description of how one table is exported and re-imported — including the exact resolution logic per lookup column. After that, every run is the same round-trip:
Export → edit in Excel → Import (upload → dry run → resolve conflicts → commit).
Every import run freezes a snapshot of the configuration it used — later edits never silently reinterpret an old run.
Building a configuration — screen by screen
Navigation on the left: Job-Konfigurationen (Job configurations) · Importläufe (Import runs) · Konflikte (Conflicts) · Importhistorie (Import history).
Start: Job configurations
The overview shows each saved configuration as a card (target table, operation, column/lookup count, version, draft state). Per card: Export ▾ (empty template / export data), Bearbeiten (edit), Import starten (start import), Löschen (delete). Up top: Neue Konfiguration (new configuration) and Excel importieren (import an Excel file without a pre-selected config — the mapping comes from the embedded manifest).
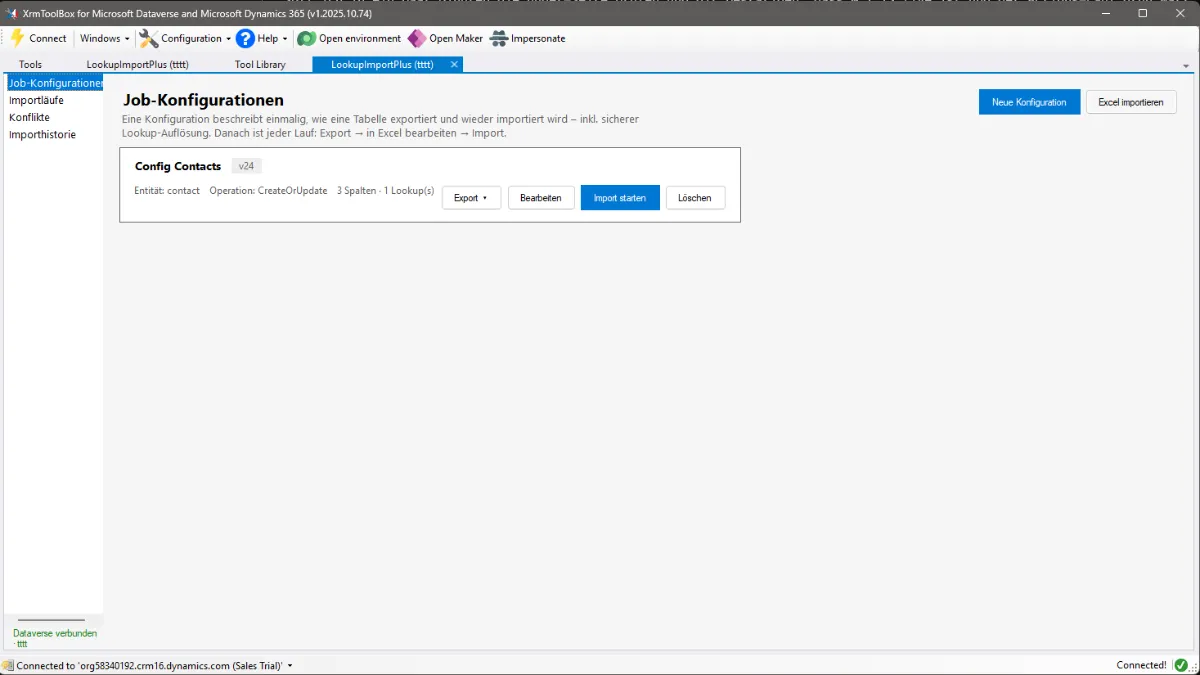 Each card is a reusable import/export definition. Export is only possible once at least one column is selected.
Click Neue Konfiguration — the editor opens a wizard with four tabs. Tabs 2–4 are locked until you pick a target entity.
1 · Entity & Source
Pick the target entity (the table you import into) — its metadata loads. As the export source you choose “Entität (alle Datensätze)” (entity, all records) or a saved view (savedquery). With a view, the rule is: the view filters the rows, the configuration decides the columns — the config attributes are injected into the view’s FetchXML.
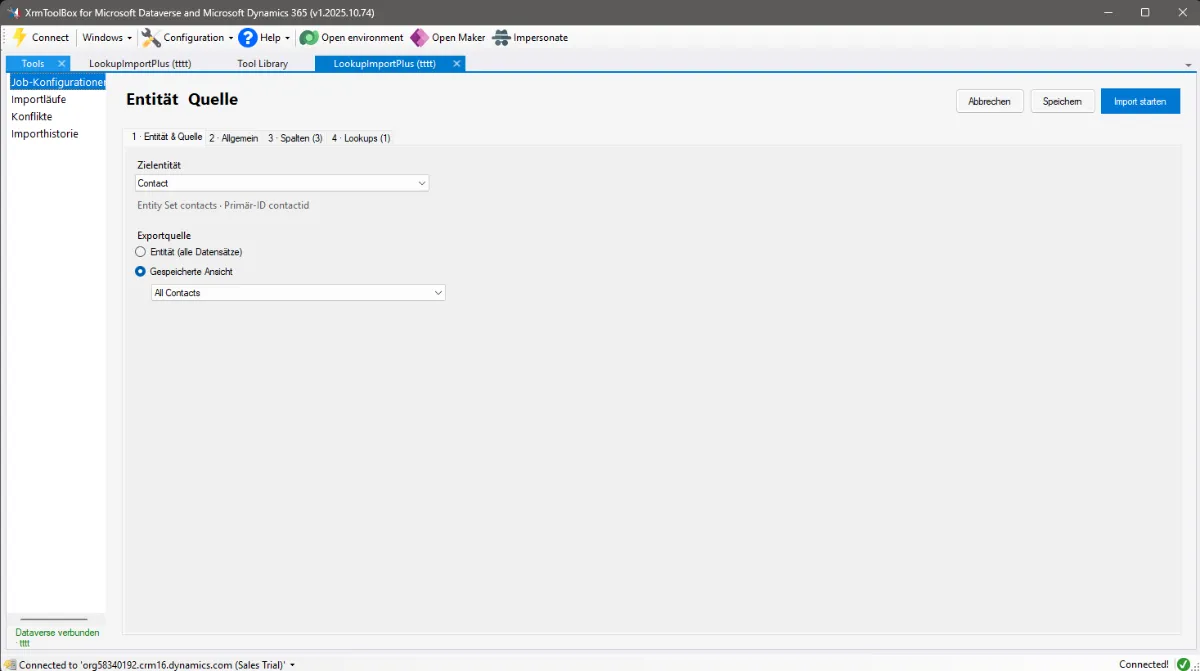 Step 1 unlocks the other tabs. Entity set and primary id are shown once loaded.
2 · General
Here you set Name, Beschreibung (description), the Operation (create / update / createOrUpdate) and the default write mode (strict / partial).
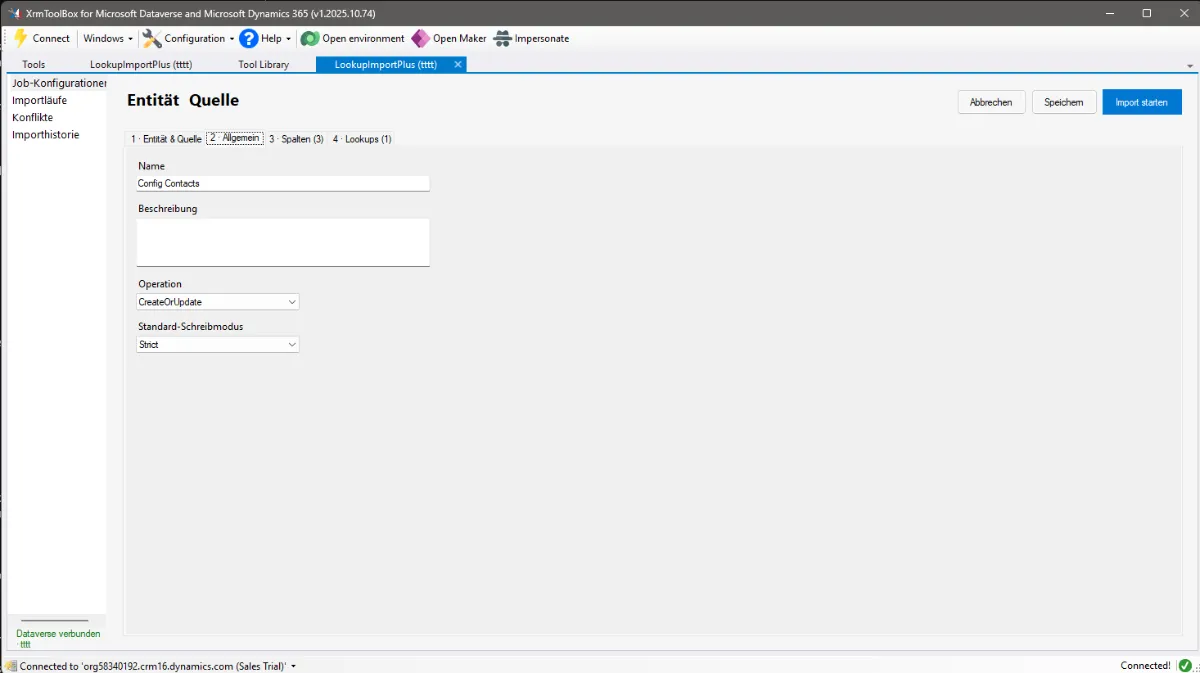 strict writes nothing until every row is clean; partial writes the clean rows immediately.
3 · Columns
The target table’s attribute list can be filtered (search · selected only · lookups only · required only · writable only). Tick the columns and set each one’s usage: Import & Export, Export only or Import only. Buttons: Daten-Vorschau (data preview), Leeres Template (empty template), Daten exportieren (export data).
Above the list is the important note: the record key lip__recordid is added automatically for update/upsert and is deliberately not selectable.
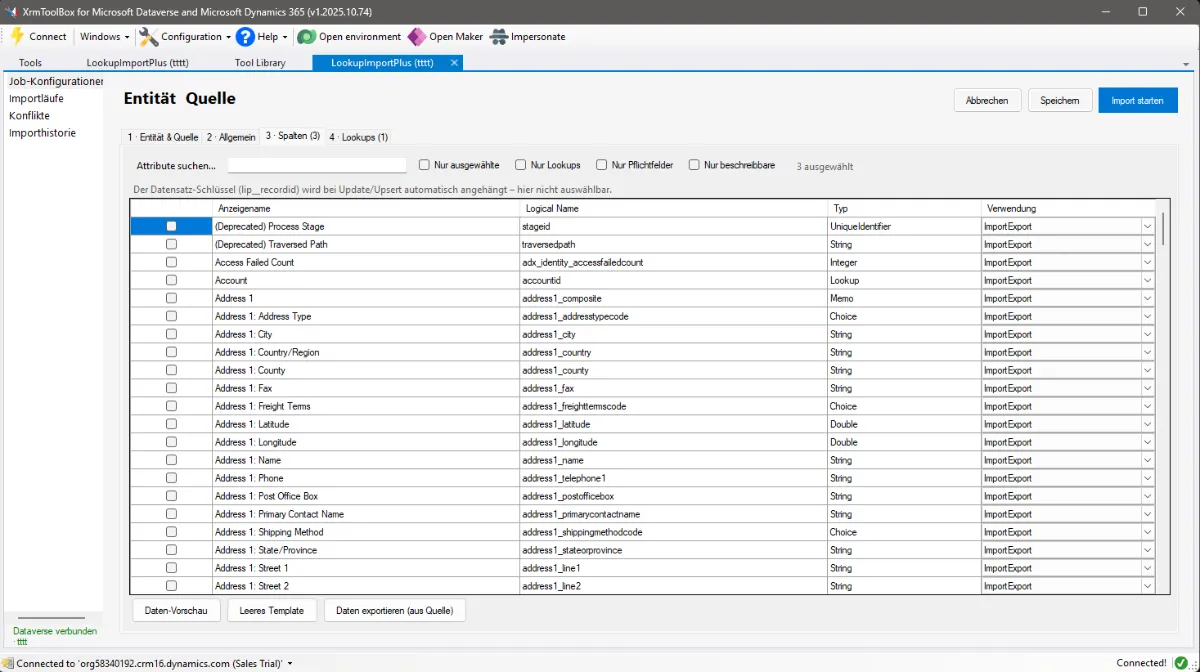 On tables with 200+ system columns the filters save a lot of scrolling. No selected column, no export.
The data preview shows real records — toggling between CRM columns (raw Dataverse fields) and schema columns (with generated), i.e. the Excel layout the export produces. That’s also where you see the technical lookup columns we’re about to use.
4 · Lookups — where the real work happens
Every selected lookup column gets its own card. The wizard explains the order itself at the top: “How each lookup is resolved — top to bottom, per row; the next step runs only if the previous found no single match.”
Per card you configure:
- Sichtbare Excel-Spalte (visible Excel column) — the human-readable column (e.g. “Firma”).
- GUID-Spalte (GUID column) — the technical column holding the target GUID (e.g. “Firma Id”).
- Business-Key-Spalte (business key column, optional) — a unique alternate value (e.g. account number).
- Konfliktstrategie (conflict strategy) — Escalate (to the conflict list), SkipRow or FailRow.
- Zieltabelle(n) (target table(s) to search) — for polymorphic lookups (e.g.
customerid= account or contact) you tick several. - Per target: search field (on the target), business key attribute (optional) and search conditions — each condition an attribute, an operator and a value source: fixed value, Excel column (same row) or relative date (days).
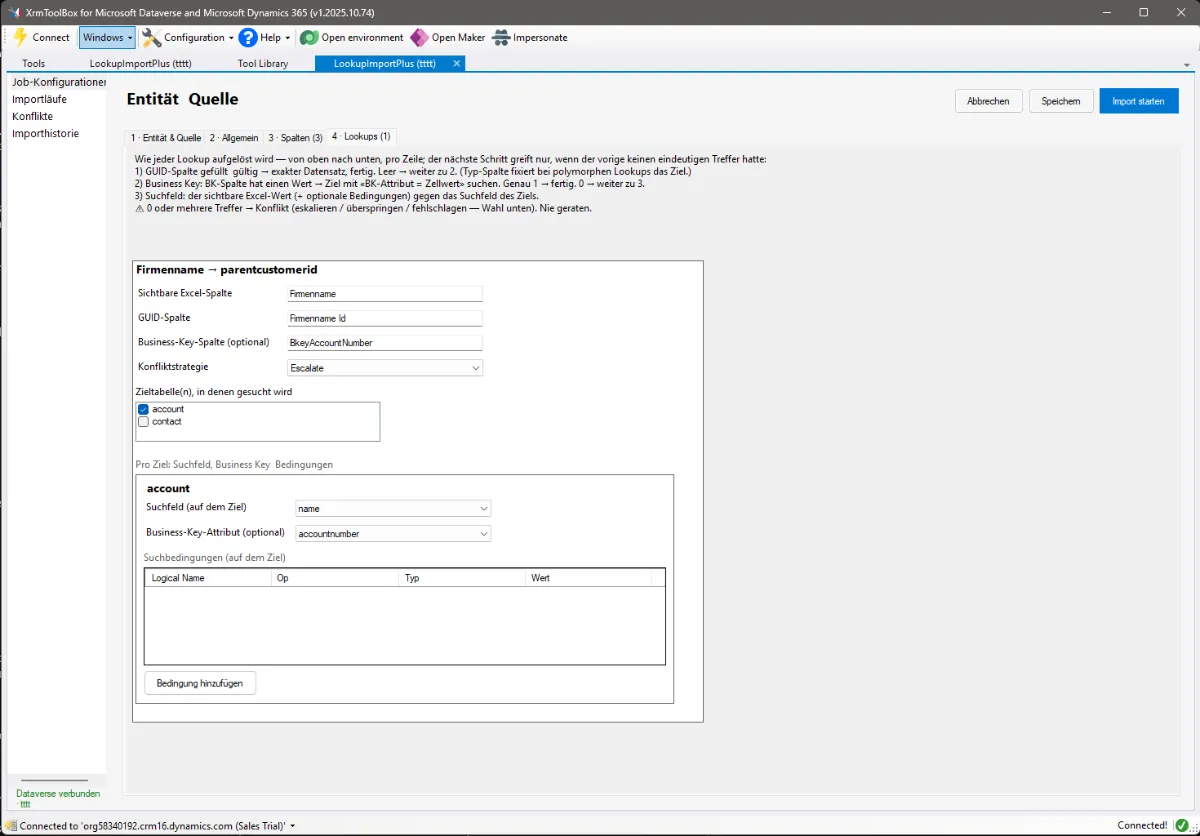 The most important screen: this is where you define how safely things resolve. Search field and business-key attribute are pick-lists of real target attributes — no free text. For a polymorphic lookup you tick additional target tables and configure them per target.
Two details from the current version that save you grief: search field and business-key attribute are drop-down lists of real attributes (only valid columns can be saved), and incomplete conditions are not saved — half-filled rows stay amber but never make it into the configuration.
Editor header: Abbrechen (cancel) · Speichern (save) · Import starten (start import).
The different resolution methods
This is the heart of the tool. The order is fixed, the first hit wins, and it’s a cascade with fallthrough — data-driven, per Excel row:
1) GUID column → 2) Business key → 3) Search field (+ conditions)1 · GUID column. If the cell holds a valid GUID, the record is retrieved by id and the target type is verified → exact hit, done, no conflict possible. Empty/invalid/not found → on to step 2. For polymorphic lookups the type column pins the target (e.g. account vs. contact).
2 · Business key. If the BK column has a value, the tool finds the target where «BK attribute = cell value». Exactly 1 hit → done. 0 → on to step 3. Several → conflict (it does not keep searching — it escalates).
3 · Search field (+ conditions). The visible Excel value is matched against the target’s search field, plus optional search conditions. 1 → done · 0 → Not found · several → conflict.
Two points that most often cause confusion in practice:
“All cells empty” is not the same as “not found”. If the GUID, business-key and visible cells are all empty, the lookup stays unset (status Empty, non-blocking) — the row is still writable. A provided but unmatchable value, by contrast, becomes Not found (blocking). That’s a deliberate deviation from the source and spares you pointless blockers.
Ambiguity is never guessed. Several matches always run into the conflict strategy:
escalate(to the conflict screen),skip(skip the row) orfail(the row fails).
The technical columns per lookup
A visible lookup column “Firma” comes with three technical columns in the export:
| Column | Purpose | Stage |
|---|---|---|
| Firma Id | the target GUID | 1 (wins immediately) |
| Firma Type | target type for polymorphic lookups (account/contact) | pins steps 1–3 |
| Firma Number | business key (e.g. account number) | 2 |
The safest route for known-ambiguous names: export real data, fill the “Firma Id” column with the correct GUID, re-import. The GUID wins — no conflict screen needed.
The import run
Upload the XLSX → first the configuration check (schema drift: real errors block, warnings are shown) → then the dry run, which classifies every row. The stat tiles show Ready / Conflicts / Errors / Total rows. The write mode (Strict/Partial) decides what commits; with open conflicts, Konflikte öffnen → (open conflicts) leads on. Commit writes via ExecuteMultipleRequest — Strict blocks until everything is resolved, Partial writes the clean rows immediately. Every row gets a clear status; the progress bar is determinate because the row count is known up front.
Status values
| Status | Meaning |
|---|---|
| Ready / Resolved | writable |
| Ambiguous | several candidates → decision needed |
| Not found | value given, but no match |
| Required value missing | validation blocks |
| Wrong target type | type column doesn’t match an allowed target |
| Skipped | deliberately left out |
| Written / Write failed | commit result |
Reminder: an empty lookup column doesn’t block — the lookup stays unset, the row is still writable.
Resolving conflicts
The conflict screen groups by source value: target field, affected rows, candidate count, status. Auflösen → (resolve, ≥ 1 candidate) or Bearbeiten → (edit, 0 hits). One decision can apply to the whole group — “41 × Contoso GmbH” is one decision, not 41. Nothing is guessed automatically.
When resolving, you see the underlying query (including the resolved time anchor), the candidate list with a deep link Öffnen ↗ (open), and the checkbox “apply the decision to all n rows”. Auswahl übernehmen → (apply selection) writes the decision back and logs it — rule, candidates, chosen GUID, user, timestamp (attribute lip_resolutiondecision). Überspringen (skip) marks the row(s) deliberately skipped.
Import history
Every run is listed here with a frozen config snapshot and counters: started, configuration + version, mode, rows, written, conflicts, status — traceable down to the individual lookup decision.
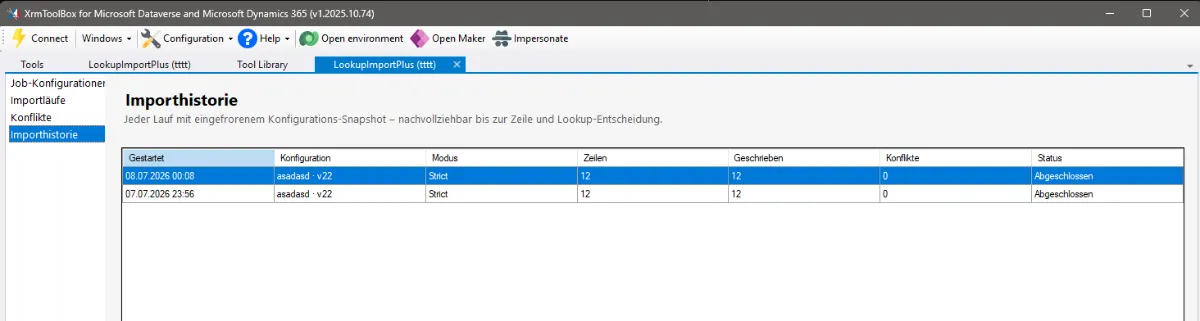 Auditable down to the row. The snapshot makes every old run reproducible.
Permissions: the most common pitfall
The connected user (or application user) needs sufficient organization-level read on target and reference tables. The “System Customizer” role alone is not enough — it may read tables like account/contact only at User level (own records only). The result: queries return 0 records even though data is visible in the web client. Fix: give the app user a role with organization read depth (or System Administrator) — or connect interactively as a fully privileged user.
Under the hood
LookupImportPlus is a WinForms plugin on .NET Framework 4.8 — the base class is an XrmToolBox PluginControlBase, the connection comes from the host (IOrganizationService). Versus the Power Apps template, the transport is swapped: instead of the Web API and @odata.bind, everything runs over the Dataverse SDK — metadata via RetrieveEntity/RetrieveAllEntities (incl. polymorphic lookup targets), search via QueryExpression, lookup binding via EntityReference, and the commit as ExecuteMultipleRequest (batch, ContinueOnError). Configurations and history are stored as JSON in the XrmToolBox settings folder. Before every run, a schema-drift preflight checks the configuration against current metadata.
Install & get started
- Tool Store: search for “LookupImportPlus” in XrmToolBox and install (the store scans nuget.org, tag “XrmToolBox Plugin”).
- Plugin repo (authoritative): github.com/brunsforge/XMRToolbox_LookupImportPlus
- NuGet: nuget.org/packages/LookupImportPlus
- Original code app (port template): github.com/brunsforge/LookupImportPlus
- XrmToolBox: xrmtoolbox.com
The short version: create a configuration → empty template or export data → edit in Excel (GUID wins immediately; else business key; else name search + conditions) → start import, check the dry run → resolve conflicts → commit. The run lands in the history with a snapshot — and you have an import that never guessed.